The Amazing Power of HomeKit Automations

When Apple introduced HomeKit, it might have seemed like it would only be for Apple products. However, it’s a powerful system that helps bring your smart home together in new ways, even if various devices aren’t compatible with each other. That’s the power of HomeKit automations. In fact, automations are the best feature of HomeKit and are easy to set up.
What Are HomeKit Automations?
Wouldn’t it be nice if your living room lights turned on, your thermostat adjusted, and you interior security cameras turned off as you unlocked your front door? This is how HomeKit automations work. As long as the device is HomeKit compatible, you can add it to a custom automation. When you perform task A, things B, C, and D happen too.

What Are HomeKit Automations
The good news is HomeKit is compatible with numerous smart home devices, such as Philips Hue bulbs, Arlo cameras, Fibraro Flood Sensor, Wemo switches and plugs, and many more. While some of these devices aren’t compatible with each other, HomeKit brings them together in automations that don’t care whether products are the same brand or not.
Benefits of Using Automations
HomeKit automations aren’t just about Apple, which is a huge benefit. While Apple products are popular, they’re not the main contenders in the smart home market. HomeKit is helping Apple make a noticeable mark, though.

Benefits of Using Automations
The biggest benefit is combining usually unrelated smart devices into single, triggered automations. For example, if a compatible smart alarm system catches movement outside, the smart bulb in your lamp may automatically turn on. Or, you can simplify your nightly routine by turning off smart lights and locking all doors at a set time.
Instead of having to set up every device or brand individually, you handle it all from the HomeKit app. For anyone with multiple smart devices, especially those requiring different hubs, a simpler option is always better.
The other benefit is the automations are completely custom to your needs. As long as the devices are compatible, you can create automations based on times, actions, and locations.
Setting Up HomeKit Automations
You’ll need two things to get started. First, you’ll need a home hub which will bring all your devices together. If you don’t currently have a hub or want a new one, this is perfect timing. You have three choices for hubs – Apple TV, HomePod, and iPad. Yes, an iPad functions well as a hub for HomeKit compatible devices. Just make sure it’s always on. This is a good use if you have an older iPad lying around.

Setting Up HomeKit Automations
Second, you need the Home app. You can control your home from your iPhone, iPad, and Mac.
To set up automations from your iPhone or iPad:
1. Tap the Automation tab in the Home app.
2. Tap the “+” button or “Create Automation.”
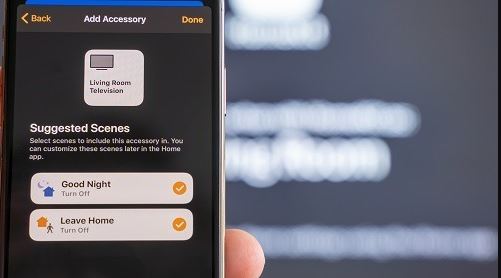
3. Choose the type of automation: An Accessory Is Controlled, People Arrive or People Leave, or A Time of Day Occurs.
4. Choose your parameters, including devices or scenes (scenes are groups of accessories triggered by your app or voice), locations, and time of day.
5. Select what you want to happen.
6. Adjust your devices or scenes accordingly.
7. Tap “Test this Automation” to ensure it works correctly.
The process works similarly on Macs. Open the Home app and click the “+” button. Go through the same process to set up the type of automation and trigger you want.
If you’re wanting to control entire rooms or large groups of devices, it’s easier to set up scenes. In the Home app, click the “+” button and choose “Add Scene.” You’ll choose your devices and their settings. For instance, you could make an Evening Living Room scene where the lights turn on at 60 percent brightness. If you return home in the evenings from work, you could add this scene as part of your Home from Work automation versus adding all the lights individually.
Always test any new HomeKit automations and scenes as you’re creating them. You can edit and delete them at any time, but it’s a good idea to make sure they’re working the way you want before you put them into motion in your daily routine.
Other than Homekit, you can also make use of SmartThings to automate your home. Check it out.
Source: https://www.iottechtrends.com/
- slot online mudah maxwin situs judi mpo slot situs judi mpo slot slot deposit dana slot 5000 slot 5000 slot 5000 slot 5000 slot 5000 link slot mpo link slot mpo link slot mpo link slot mpo link slot mpo mpo slot slot pay4d slot nexus slot idn slot online slot online slot online slot online slot online slot gacor slot hoki slot4d judi slot online hoki slot bca slot bri slot dana slot mandiri slot mpo slot 5000 slot88 slot pulsa 5000 slot dana 5000 slot maxwin slot303 slot77 judi mpo slot slot pulsa 5000 mpo slot bandar togel terpercaya mpo slot pay4d nexus slot idn slot mpo slot dana 5000 slot maxwin
