How to Create a Home Automation Network with SmartThings

Starting life in 2012 as a Kickstarter campaign, SmartThings was one of the first smart home systems to enjoy mainstream adoption.
If you want to make your home smarter, then this is a popular, tried-and-tested platform that’s compatible with the widely-used ZigBee and Z-Wave protocols. Once your home automation network is up and running, it’ll be able to communicate with any smart device that supports ZigBee or Z-Wave, so you won’t be tied into using Samsung-branded devices.
Regardless of whether you’ve purchased your first SmartThings device and are unsure where to start, or you want to see exactly how SmartThings works before opening your wallet, in this article I’ll show you how to setup a complete smart home automation network, in under an hour.
What you’ll need
By the end of this article, you’ll have:
- Setup your SmartThings Hub.
- Added at least two devices to your smart home network.
- Created a custom rule, which will ping your smartphone if someone opens your door or window while you’re away from your property.
To complete this tutorial, you’ll need a SmartThings Hub, a Multi Sensor and your smartphone or tablet. A Presence Sensor is optional, or you can use your mobile device as a presence sensor.
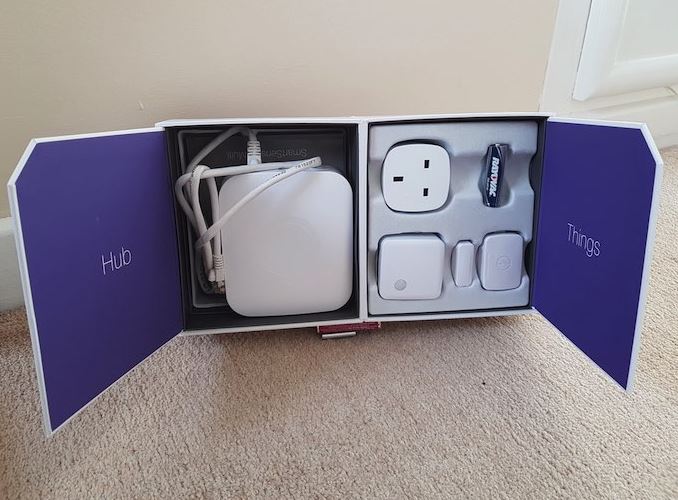
SmartThings Hub
While you can purchase the SmartThings Hub and sensor(s) separately, if you’re serious about home automation, then I’d recommend investing in a SmartThings Starter Kit, as it contains everything you need for this tutorial, plus some added extras.
SmartThings Hub: The brains of the operation
Every SmartThings network needs a Hub, which will be responsible for connecting and coordinating all of your smart gadgets.
Simply connect your Hub to a power supply and router, using the cables and power socket that came with your Starter Kit. Your new Hub will then cycle through a series of LEDs, and download any available updated.
When the LED turns green, your new hub is ready to use!
Control your smart home from anywhere
Whether it’s cranking the thermostat up when you’re on your way home from work, or dimming the lights from the comfort of your couch, one of the major benefits of a connected home is the ability to control it from your mobile device.
There’s two apps that you can use to communicate with your SmartThings network: SmartThings Classic and SmartThings. Since some users have reported that SmartThings doesn’t play nicely with non-Samsung devices, I’ll be using SmartThings Classic:
- Install the Classic app for iOS or Android.
- Launch the app, and follow the instructions to create your account.
- Samsung will request your welcome code, which is included in the leaflet that came with your SmartThings Hub.
- When prompted, grant the app access to your location.
SmartThings Classic will now connect to your hub.
Build your network: adding your smart devices
Now we’re ready to start adding smart devices to our network:
1. Grab your Multi Sensor, and pull its “Remove to pair” tab.
2. In the SmartThings app, select the “My Home” tab.
3. Tap “Things -> Add a Thing.” The app will now display a “Looking for devices…” message.
4. Once the app has detected your Multi Sensor, tap “Rename device” and give it a unique name.
5. Tap “Done -> Save -> OK.”
Navigate back to the app’s main dashboard, and you should see that the Multi Sensor is now listed as a “Thing.”
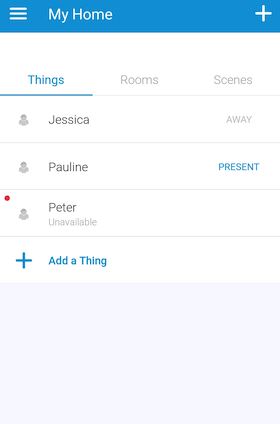
My home
Live with other people?
Most smart devices will benefit from knowing when you’re at home.
Samsung provides a dedicated Presence Sensor, but when you setup the SmartThings Classic app, SmartThings automatically starts using your smartphone or tablet as a presence sensor.
If you live with other people, then they can purchase their own Presence Sensor or you can install the SmartThings Classic app on their smartphone or tablet:
1. Install the SmartThings Classic app on their device.
2. Launch the app, and tap “I’m a SmartThings user.”
3. Enter the login details for your SmartThings account. You must both be using the same account.
4. Tap “Add a Thing -> Add Device Manually -> Presence Sensors.”
5. Tap “Mobile Phone > Connect Now.”
6. Give this device a name, and then tap “Save.”
Samsung SmartThings will now know whether this person is home, or away.
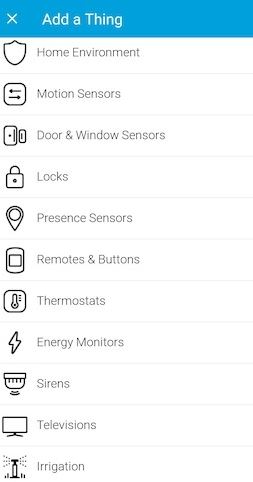
Live with other people
Monitor your doors and windows
Next, we need to setup the Multi Sensor to monitor when a door or window is opened, or closed.
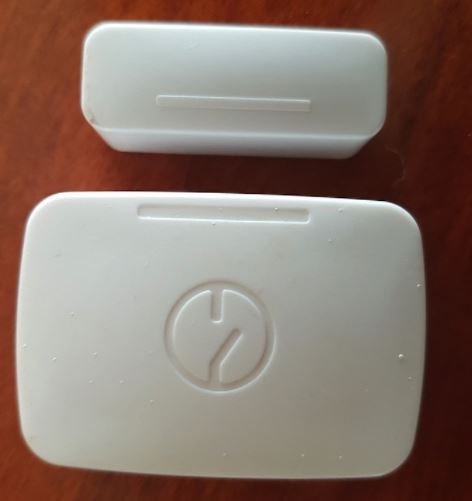
Monitor your doors and windows
Samsung’s Multi Sensor comes with a selection of screws and adhesive patches that you can use to fix it into position. When your chosen door or window is closed, the lines on the Multi Sensor’s casing must come into contact, in order to register open and close events properly.
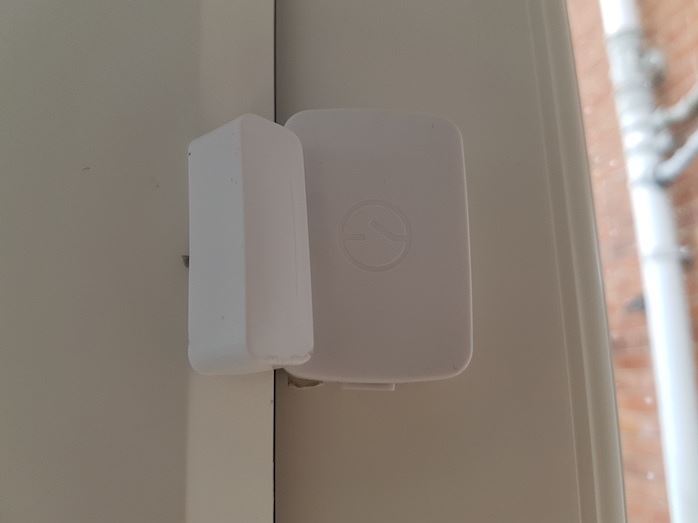
Sensor
Depending on where you’re fixing the sensor, this may take a bit of trial and error so you may want to experiment with the adhesive strips before you start drilling holes into your walls.
Get security alerts on your smartphone
Let’s create a rule that’ll send us a notification every time someone opens this door or window:
- In the app, select the “Dashboard” tab, followed by “Smart Home Monitor.”
- Tap the little cog icon.
- Navigate to “Custom -> New monitoring rule.”
- Tap “What kind of device do you want to use?” and then select “Open/Close Sensor.”
- Find the “Sensor opens” slider, and push it into the “On” position.
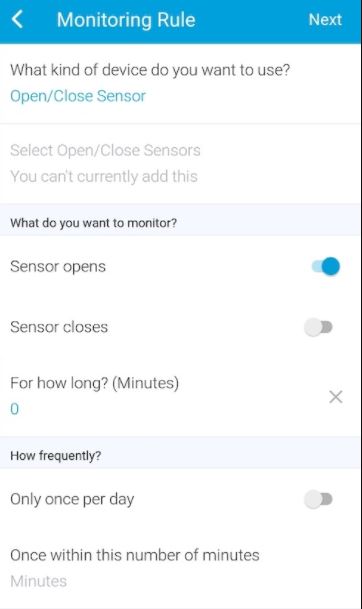
Monitoring Rule
- Find the “Text & Push Notifications” slider, and push it into the “On”position.
- Enter your mobile phone number, and then type the message you want to receive.
- Tap “Save.” SmartThings will name your rule automatically based on various parameters, or you can create a custom name.
- Tap “Save.”
Try opening the door or window – you should now receive a notification on your smartphone!
Do you really need to know about every door open event?
Chances are you don’t want to be notified every single time someone opens this door or window, so let’s make our rule smarter and only generate a notification when you’re away from home.
Making your smart home smarter: Creating modes
The first step is creating an “Empty house” mode:
1. Log into the SmartThings IDE using your SmartThings username and password.
2. Select “My Locations.”
3. Find your location in the list, and give it a click.
4. Find “Modes,” and select “Create new.”
5. Give your mode a name; I’m using “Empty house.”
6. Click “Create.”
Automate your smart home with routines
Next, we need to set our mode to trigger automatically, by creating an “Everyone Leaves” routine:
1. In the Classic app, navigate to “Automation -> Add a Routine.”
2. Select “Add a Routine.”
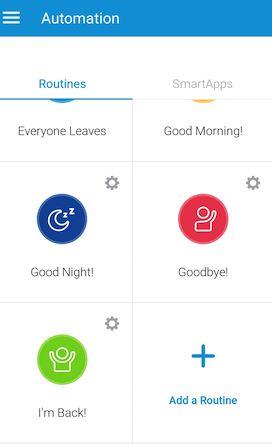
adding your smart devices
3. Name this routine “Everyone Leaves” and tap “Next.”
4. Select “Change the mode to -> Empty house -> Done.”
5. Select “Automatically perform….” followed by “Everyone leaves.”
6. Tap “Which?” and select all of your presence sensors.
7. Tap “Done -> Save.”
Now, when the last presence sensor vacates the property, the “Everyone Leaves” routine will run, and switch your smart home into “Empty house” mode.
Connecting “Empty House” and “Everyone Leaves”
Finally, we need to active the door monitoring rule when SmartThings enters “Empty house” mode:
- Tap the “Smart Home Monitor” card.
- Tap the cog icon.
- Select “Custom,” followed by your rule.
- Tap “Only when mode is -> Empty house -> Done -> Save.”
SmartThings will now start monitoring this door and window every time you leave the house, and notify you about any suspicious activity.
Conclusion
Once you’ve setup your SmartThings network, you can continue adding devices, modes and rules, to build the smart home of your dreams.
Source: https://www.iottechtrends.com/
- slot online mudah maxwin situs judi mpo slot situs judi mpo slot slot deposit dana slot 5000 slot 5000 slot 5000 slot 5000 slot 5000 link slot mpo link slot mpo link slot mpo link slot mpo link slot mpo mpo slot slot pay4d slot nexus slot idn slot online slot online slot online slot online slot online slot gacor slot hoki slot4d judi slot online hoki slot bca slot bri slot dana slot mandiri slot mpo slot 5000 slot88 slot pulsa 5000 slot dana 5000 slot maxwin slot303 slot77 judi mpo slot slot pulsa 5000 mpo slot bandar togel terpercaya mpo slot pay4d nexus slot idn slot mpo slot dana 5000 slot maxwin
